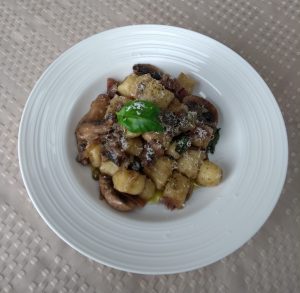
A different take on gnocchi this time. Not fried, these soft, pillowey, potatoey mouthfuls of joy in the rich sauce went so much better than I thought it would. Simple as to make the sauce, the key is a bit of pancetta or bacon to build the base flavour.
Can’t think of anything else to say, but definitely recommend trying this!
Gnocchi with red wine and mushrooms
Serves: 3
Prep time: 15 minutes
Cook time: 15 minutes
Total time: 30 minutes (but making the gnocchi will take extra time)
Ingredients:
Half a brown onion
100g of pancetta or bacon
300g of mushrooms (your choice)
1 tsp capers
50-75mL red wine
3 serves of gnocchi (about 100g of potato each)
3 Tbsp extra virgin olive oil
Salt and pepper
~2 Tbsp starchy water from the gnocchi
Basil – as many leaves as you can afford
Parmesan or pecorino to serve
Instructions:
Cook the gnocchi and reserve some of the starchy salted water. I think it’s best to avoid putting all the gnocchi in a bowl as they tend to squash the at the bottom and continue to cook. So maybe put them on a large plate or other flat surface (a clean chopping board?).
Finely dice the onions, and bacon/pancetta. Slice the mushrooms.
In a large pan over medium-high heat, add the onions and bacon/pancetta in a small amount of olive oil. The fat from the bacon/pancetta will render out so don’t overdo it at the start with the olive oil.
After a few minutes add the mushrooms and capers, fry for a few more moments, then add the red wine – a decent splash, about 50mL or more if you think, but we don’t want too much liquid in the pan at this stage. Add a bit of your starchy water now, about two tablespoons. There should now be a small amount of liquid in the bottom of the pan and it’ll be a little bit thickened from the starches.
Once the mushrooms are cooked (a couple more minutes), add the gnocchi to the pan with the rest of your olive oil and turn the heat up. Saute to allow the sauce to thicken a bit. At this point, taste, and salt if required – avoid over-salting too early due to the intrinsic salt from the bacon/pancetta. Add a decent bit of pepper.
Remove from the heat and stir through some fresh basil.
Serve topped with pecorino or parmesan with some extra basil and olive oil.
I had fun with this one – it’s not always I get to cook with as much wine as I like. My mum really liked it; I thought it was pretty nice, maybe 8/10 good.
The recipe is based on Gennaro’s “chicken supreme”, but I’ve made a few modifications based on what I felt like doing and what we had. The richness and saltiness of the sauce from the oliveoil, olives and anchovies really make this dish. People are often unsure about using anchovies because of their strong smell, but give it a go and you’ll see it adds incredible flavour without a fishy scent. Overall a pretty straightforward recipe, no reason why anyone couldn’t make this.
I suggest butterflying the chicken breast, as this will help it to cook a bit more evenly – unfortunately I had two medium breasts and one large one and even each one on the thinner aspect was slightly overdone.
Shall we?
Italian chicken in red wine sauce
Serves:3-4
Prep time: 20 minutes
Cook time: 20 minutes
Total time: 40 minutes
Ingredients:
3 medium chicken breasts, butterflied if you wish
10 olives
2 tsp capers
4 cloves garlic
1 chilli
5 anchovies
Half a can of tomatoes, crushed
6 medium portobello mushrooms
~1/2 cup of your choice of red wine
~4 Tbsp extra virgin olive oil
Salt and pepper
Small amount of flour (to coat chicken)
Parsley (to serve)
Instructions:
Pit and halve the olives. Slice the garlic, chilli, anchovies, mushrooms and parsley while you’re at it.
Season the chicken with salt and pepper. Coat sides with a dusting of flour. The flour not only helps the browning/crust of the chicken but will add a bit of thickness to the sauce.
In a large pan over medium-high heat, fry the chicken in two tablespoons of extra virgin olive oil until lightly golden-brow on both sides, about 2-3 minutes per side. Deglaze the pan with 1/4 cup of red wine (half of what you have). Let the alcohol cook off, then remove the chicken.
Add another tablespoon of the olive oil and lightly fry the garlic, chilli and anchovies for a minute. Add the mushrooms, stir, then add the rest of the wine and the tomatoes. Add olives and capers as well. I don’t think there’s any particular order once the garlic, chilli and anchovies are fried. You could save a bit of wine to go in the pan just before you finish the cooking.
Once the sauce is simmering, return the chicken to the pan and cover with a lid for around 5-10 minutes or until the chicken is cooked.
Taste the sauce now – it will likely already be salty enough from the anchovies and olives, but add salt if required. Stir through the chopped parsley and one more tablespoon of olive oil.
Serve with anything you like! I made roast potatoes and sauteed some cabbage (only veg we had).
Concluding remarks: The leftover sauce can be used for a super quick and easy pasta for the next day! Hope your mum like this as much as mine did.
Simple flavours, big love. Food is one of the ways I express love and gratitude to others. Only two people in my life have been served this creation, but hopefully that number will increase in the future!
With plain, simple ingredients, there’s nowhere to hide – it’s all in the way you cook it. Two keys to success: using fresh produce (garlic, chilli, tomatoes and parsley) and seasoning the mushrooms. They make all the difference in the world to the final product. On this occasion I used wine (because we had some in the fridge), but in lieu of wine, salted pasta water works just as well. I also had to use sundried tomatoes (because cherry tomato prices have hiked in the lockdown) which wasn’t ideal but still worked okay. For the recipe that follows I’m including the ingredients I would use if everything was available.
Okay let’s go!
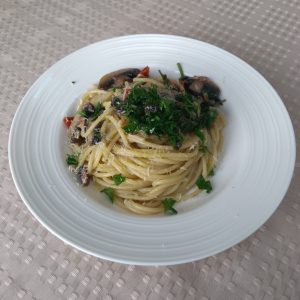
Mushroom pasta (vegan)
Serves: 2
Prep time: 15 minutes
Cooking time: 15 minutes
Total time: 30 minutes
Ingredients:
200g dried spaghetti
4 cloves garlic
1 fresh chilli
6 or 7 medium portobello mushrooms
4 cherry tomatoes
2 tsp capers
Splash of white wine
Salt and pepper
2 Tbsp extra virgin olive oil + extra to serve
Bunch of parsley
Pecorino (or parmesan) cheese (optional) would make it not-vegan
Instructions:
Bring a large pot of well-salted water to the boil. Add the spaghetti, taking care not to break them. Keep an eye on this, stirring occasionally to prevent from sticking to each other or the bottom of the pot. We want to cook the spaghetti until just before it is al dente, then finish the cooking process in the pan.
In the meantime, thinly slice garlic and chilli, removing the seeds of the chilli if you don’t want it too spicy. Slice the mushrooms thickly and halve the cherry tomatoes.
In a large pan over medium heat, fry the garlic and chilli in a good amount of olive oil (nominally two tablespoons) for about a minute or two before adding mushrooms and capers and frying for an extra minute. Season well with salt and pepper.
Add a splash of white wine to the pan. As Gennaro would say “the wine you drink is the wine you use”. Add the cherry tomatoes and continue to cook.
By now the spaghetti will be pretty much ready. The best description I can provide about when the spaghetti is done is when it is pretty much cooked but still has slightly too much bite to it. At this point, drain the spaghetti, reserving a cup of the pasta water.
Turn the heat in the pan up to high and add the drained spaghetti. Saute. The spaghetti will soak up the liquid, so add the pasta water in small amounts as required. This part is key because the starches in the pasta water mixed with the olive oil provide thickness/creaminess to the sauce and ensure the sauce sticks to the spaghetti rather than pooling at the bottom. This part takes a bit of practice to know when the spaghetti is done and to know how much pasta water to add – you want just enough that there’s a bit of sauce but it’s not swimming in it.
Take off the heat and stir through some chopped parsley and more fresh olive oil. Taste, and add salt if required.
Serve topped with a bit more parsley and olive oil, plus a cheese like pecorino if you wish (would become non-vegan).
Concluding remarks: Step 6 is the key for pretty much every pasta dish ever. It’s one that takes practice, but at least every time you practice you’ll get a treat at the end!
Much like Sam Cane at the breakdown, this one is nothing flashy, but reliably gets the job done every time. A great way to use up eggs and a good way to pack in the daily veg intake, I enjoy that you can add literally anything you like. A go-to when you have bits and pieces to use up.
I’ve tried baking and not-baking the frittata and it’s probably a matter of personal preference. Finishing the frittata in the oven produces a nice golden-brown top, but the interior dries out slightly more. This one was just done on the stove-top with a lid – the stove was too small for the pan and the lid didn’t fit tightly, so it burned slightly underneath, but other than that still turned out pretty well. I probably prefer the stove-and-cover method as the interior doesn’t dry out.
Nothing else to say on this really; the simple flavours speak for themselves. I’ve included in the recipe what I used this time but it changes every time depending on what we have. Some ideas: feta, smoked salmon, cream cheese, capers, sundried tomatoes etc.
Ingredients:
8 large free range eggs
1 capsicum
Half a large brown onion
2 tsp capers
2 cloves garlic
1 chilli (optional)
A couple of handfuls of beans
A good handful of spinach
4 small portobello mushrooms
1 tomato
50g your choice of grated cheese
10g finely grated parmesan (optional)
A good splash of extra virgin olive oil
Salt and pepper
Instructions:
Slice capsicum, onion, garlic, chilli, beans (if need be), mushrooms and dice the tomato.
In a pan large enough to hold all the vegetables and eggs, heat a good splash of olive oil over medium-high heat. (Aside: olive oil has a low smoke point so shouldn’t really be used for cooking on high heat)
Fry capsicum, onion, garlic, chilli, beans, capers and mushrooms for a few minutes before adding the tomatoes and spinach. Feel free to add a crack of salt and pepper at this stage (I think mushrooms always need a bit of salt at the start to bring out the flavour). The mixture needs to be dryish before the eggs go in.
While the veg is frying, crack the 8 eggs into a large bowl and whisk to bring together. Season with a bit of salt and pepper but not too much because we’re going to add cheese. The goal is just to combine the yolk and egg, not so much to beat air into the mixture. Then add the cheese and parmesan to the eggs and mix.
Once the veg has fried for a bit longer and there’s no obvious liquid in the bottom of the pan, pour the egg mixture into the pan and give the whole thing a good mix, evenly spreading the veg.
Turn the heat down to a medium heat, cover and let cook for around 7 minutes or until the top of the frittata has only just solidified. Alternatively you could bake or grill in the oven until golden brown on top.
Turn the frittata out onto a large plate. This can be done by placing the large plate on top of the pan, then using a long tea towel grip the plate and the pan together at the sides and flip.
Top with a bit more parmesan or garnish with parsley if you like. Serve with your favourite sauce or enjoy plain. I had mine today with a bit of Greek yoghurt and sweet chilli.
Concluding remarks: This is great for packed lunches too! Whip it up on a Sunday and it’ll probably last through to Wednesday lunch.
First post! Excuse the picture quality, lack of accompanying images and the writing style for now – bigger things to come in the future hopefully!
I’ve been working on getting gnocchi right for a while now, playing with flour type, flour ratio, degree of knead, cooking time, frying/not frying etc. First couple of times the gnocchi fell apart or turned into mush. Then after a few changes they held together well, but were a bit gluey. Finally today the texture was just right!
From what I gather so far there’s a few keys to getting it right. Type of flour: High-grade (or strong flour) – the times I tried using plain flour, the gnocchi ended up gluey. Type of potato: Floury potatoes are key – in NZ, agria is probably the most accessible. Flour to potato ratio: This one is contentious because I think it probably changes depending on type of potato, how you cook it etc. My favourite Italian chef Gennaro Contaldo suggests 1 part flour to 10 parts potato (e.g. 100g of potato needs 10g of flour). Someone else I saw suggested 0.27 (e.g. 100g of potato needs 27g of flour). I tried both. I found too much flour and you lose the potato texture; too little flour and you might as well be having mash (but perhaps I need to try Gennaro’s method again). I had success today at 0.16 (e.g. 100g of potato needs 16g flour). Length of knead and technique: I think there is a reasonable window between under-working and over-working the dough, but rather than kneading it’s more of a pressing/folding motion. I work the dough a little past the point that it just comes together so that I have more confidence in the gnocchi not falling apart. Cooking time: The only rule is that you must not overcook the gnocchi – very easy to do. Some people suggest leaving the gnocchi in the boiling water for 20-30 seconds after it floats but I think it’s more like 10 if that. If cooked for too long it will turn to mush regardless of how well you’ve done all the steps prior.
With this in mind let’s get to it!
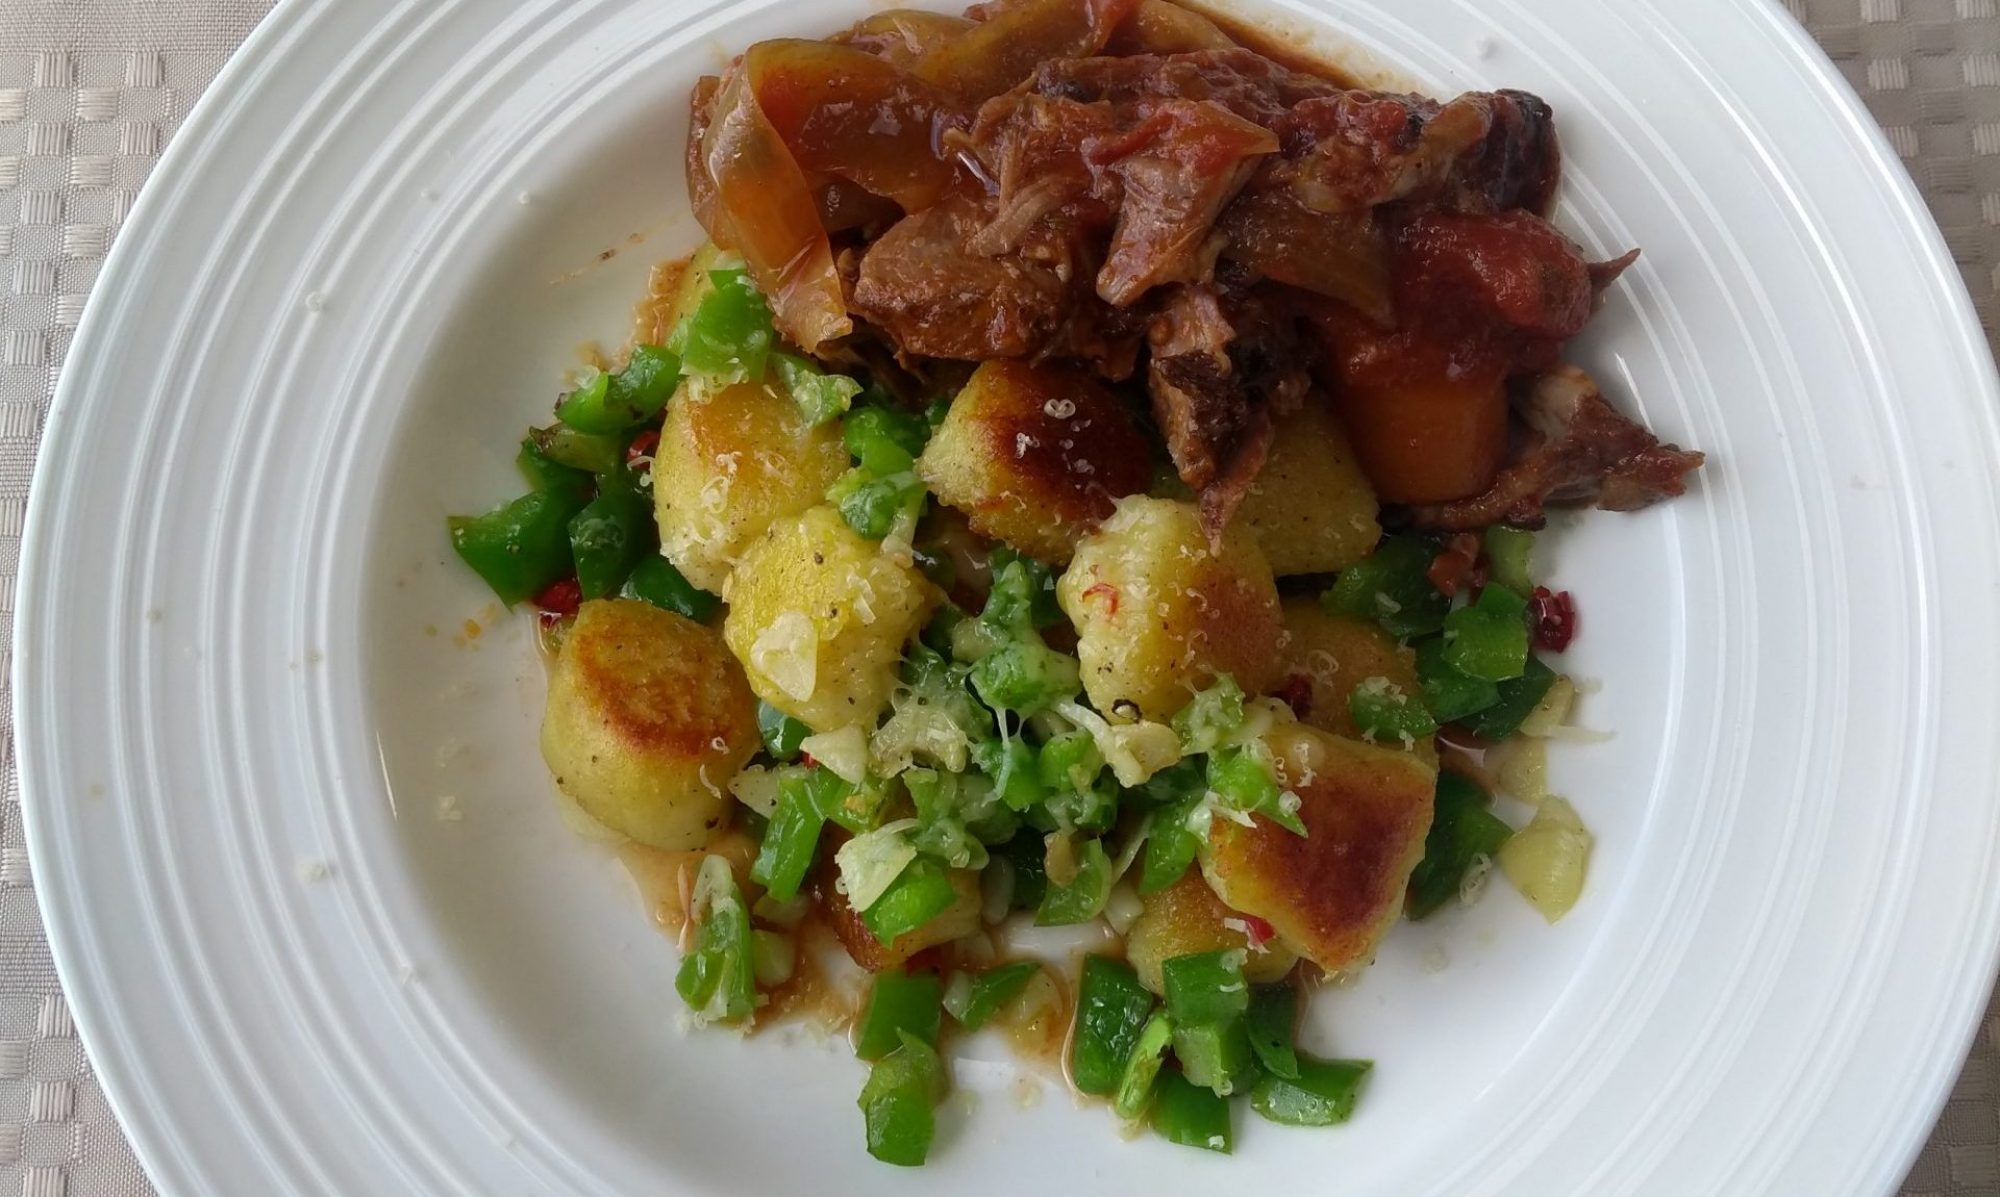
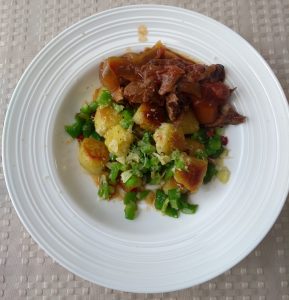
Note: The lamb shank was leftovers and went nicely with the rest of it. Any red meat stew would pair well. This recipe is just for the gnocchi.
Crispy gnocchi with capsicum and olive oil (vegan) Serves: 2
Prep time: 45 minutes
Cook time: 10 minutes
Total time: 55 minutes
Ingredients for gnocchi:
3 medium Agria potatoes
~ 30-40g High grade flour + extra for dusting
Pinch of salt
Pinch of pepper
Pinch of nutmeg
Ingredients for sauce:
Extra virgin olive oil (cold pressed) Ideally Red Island or The Village Press, wouldn’t recommend Lupi
3 cloves garlic
One small capsicum
Chilli (optional but recommended)
Top with:
Parsley
Pecorino or Parmesan Cheese (this would make it not vegan)
Instructions:
Rinse and scrub the potatoes if necessary. With a paring knife, stab them 3 times on one side and 3 times on the other. Microwave for 3.5 minutes. Flip and microwave for another 3.5 minutes. Continue in 1 minute increments if not cooked after 7. This produces potatoes not dissimilar to baked potatoes in a fraction of the time and energy.
In the meantime, slice the garlic and chilli. Dice the capsicum.
While still hot, remove the skin from the cooked potatoes using a paring knife or just your hands.
If you have a potato ricer, rice the potatoes out onto a flat surface (try to distribute the potato evenly across the surface rather than piling it into a mound) and allow to cool. This lets the steam escape. Otherwise use a fork to bash them up a bit and do the same, but don’t overwork them at this stage.
Once cooled, weigh the potato and then put it back on the flat surface (again spreading it out). Multiply the weight of the potato by 0.16 and measure out that amount of high-grade flour.
Sprinkle a pinch of salt, pepper and nutmeg across the top of the potato, then cover the potato evenly with the flour.
Using a blunt tool like a dough scraper or butter knife, use a chopping motion across the top of the mixture to start to incorporate the flour and potato. This starts the mixing process without kneading which would activate the gluten.
After around 30 seconds, start to bring the mixture together by pressing down and folding the crumbly parts into the dough. Press, fold. Repeat until there’s no more crumbs and the dough just comes together. Then do a few more gentle presses and folds before shaping the dough into a ball and dusting with flour.
Quarter the dough using the same blunt tool, then press gently between your hands to start to form a cylinder. On a flat surface very lightly dusted with flour, gently roll the dough using your fingers with a backwards-forwards motion of the arms. Aim for a log around 2cm thick. If the log starts to lose structure and fall apart as you roll, this may be because you need to be more gentle or you haven’t worked the gluten quite enough. If this happens, fold the log in half on itself and squeeze it a few times to work the dough before trying again.
Once you have rolled the dough into logs, dust them with flour, then use the same blunt tool to cut the logs to form the gnocchi, roughly into 2x2cm squares (they will expand when cooked).
Bring a large pot of water to the boil. Salt it well. Cook the gnocchi in batches so as not to cool the water too much, as this would mean they are soaking in the water for longer than necessary. After only a minute or two, once they float up (they will probably start to bounce up and down with the convection currents), wait another 10-15 seconds before removing and placing on a plate (or other surface where they aren’t crushing each other).
Heat 2 tablespoons of olive oil in a large flat pan on a medium-high heat. Remove from the heat to place the gnocchi into the oil but try not to add too much of the gnocchi water as it will cause the oil to splash. Return to heat and brown both sides of the gnocchi – this might take a few minutes. Just before the second side is done, add in the garlic, chilli and capsicum. Fry for another 2-3 minutes, but don’t let the garlic burn. Add another pinch of salt and pepper.
Serve topped with chopped parsley and another splash of olive oil (definitely) and pecorino or parmesan cheese (if you wish).
Concluding remarks: Have fun, chances are it won’t go quite to plan the first time round. To be honest it felt like a bit of a fluke that they worked out well today. The simple flavours of chilli, garlic and capsicum keep the gnocchi as the centrepiece, but additions such as cherry tomatoes, mushrooms, broccoli, feta, capers, olives etc. would go down a treat. Thanks for bearing with me!