
I recall in first year trying some funky yellow bread from the Otago Farmers’ Market – the fragrance from the cumin seeds and yellow aesthetic from the turmeric was what stuck with me. Back then I would have had no idea how to go about recreating such a creation, but I decided to give it a go because what else is there to do at the moment?
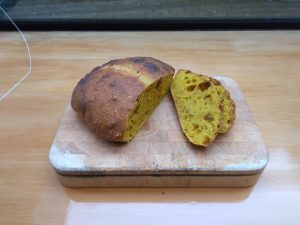
This one turned out pretty well – great flavours and a nice open crumb (interior of the bread). However, I think I needed to bake for an extra 10 minutes as it was possibly a fraction underdone. I’d give this bread a solid 7/10 and one to definitely make again.
The process of making this dough is super simple – no kneading involved – instead there’s a folding technique that you can do once or twice, then leave it overnight to rise. I went with an 80% hydration dough as I wanted an open, airy interior, but this makes the dough a bit more sticky. Not really an issue as there’s no kneading.
Anyhow here it is.
No-knead cumin and turmeric bread (vegan)
Serves: 3-4 (maybe 8 slices – it’s a small loaf, feel free to upscale)
Hands-on time: 10-15 minutes
Hands-off time: ~4-24 hours
Cooking time: 30-40 minutes
Ingredients:
300g high-grade flour
240g water (80% hydration, note that for water 100mL = 100g)
1/2 tsp salt
1/4 tsp yeast (this gives it a slow rise, but add more if you need a faster rise)
1 Tbsp turmeric
1 Tbsp cumin seeds
Splash of olive oil
1 tsp sugar (optional – I only added it because I thought it might balance the bitterness of the turmeric)
Instructions:
- In a dry pan, toast the cumin seeds to release the fragrance.
- In a large bowl, mix the dry ingredients (flour, salt, yeast, turmeric, cumin seeds, sugar). Then add the 240g of water and a splash of olive oil (nominally 1 tsp).
- Stir with a butter knife until the yellow colour looks evenly spread throughout the dough. It will be very rough at this stage.
- You could now probably just wait 12-24 hours for the dough to double in size and then turn it out and use it. However I folded the dough a couple of times in that waiting time to improve the structure of the dough. Here’s how to do that:
https://www.youtube.com/watch?v=eTo_Ho5C6sk - With wet hands on a dry surface, turn the dough out and shape it into a boule. This one takes practice and is definitely not something I’m too great at. Here’s how to do that:
https://www.youtube.com/watch?v=oCM3wHFk2SE - Once you’ve shaped the dough pop it onto your baking tray (I used baking paper). Let it rest for about 30 minutes. Preheat oven to 220 degrees C in the meantime.
- Once rested, bake in the oven for 35-40 minutes. I baked mine for 30 and thought it needed a little longer. The crust is likely to go quite dark, but that’s okay.
- Finally let the dough cool on a wire rack (must allow air flow underneath!). This finishes the cooking process.
Concluding remarks: Folding the dough and shaping into a boule are the only two challenging parts to this method. If you wanted to try scoring the dough (which ideally you would) that happens just before the dough goes in the oven. I just haven’t figured out how to yet (maybe my knives aren’t sharp enough?). Anyway enough for now.